Home > Scan > Scan from Your Computer (Windows) > Scan Using Nuance™ PaperPort™ 14SE or Other Windows Applications > TWAIN Driver Settings (Windows)
TWAIN Driver Settings (Windows)
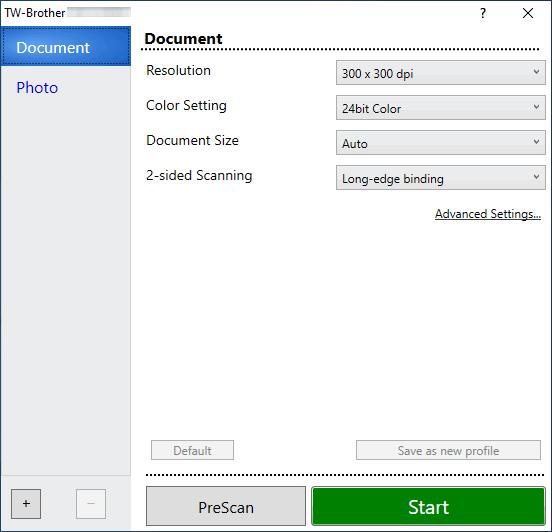
- Note that the item names and assignable values will vary depending on the machine.
- Load only one document per scanning sequence when Long Paper or Carrier Sheet Mode is selected.
- Scan
- Select the Photo or Document option depending on the type of document you want to scan.
Scan (Image Type) Resolution Colour Setting Document Use for scanning text documents. 300 x 300 dpi 24bit Colour Photo Use for scanning photo images. 300 x 300 dpi 24bit Colour
- Resolution
- Select a scanning resolution from the Resolution drop-down list. Higher resolutions produce a finer scanned image but consume more memory and increase transfer time.
 Long Paper is available for scanning at resolutions below 300 x 300 dpi.
- Color Setting
- Select from a range of scan colour depths.
-
- Auto
- Automatically detects whether the document uses colour and generates a scanned image of it. For documents that mix colour and monochrome pages, colour pages will be scanned in Colour mode, while monochrome pages will be scanned in Black & White mode.
- Black & White
- Use for text or line art images.
- Grey (Error Diffusion)
- Use for photographic images or graphics. (Error Diffusion is a method for creating simulated greyscale images without using true grey dots. Black dots are put in a specific pattern to give a grey appearance.)
- True Grey
- Use for photographic images or graphics. This mode is more accurate because it uses up to 256 shades of grey.
- 24bit Colour
- Use to create an image with the most accurate colour reproduction. This mode uses up to 16.8 million colours to scan the image, but it requires the most memory and has the longest transfer time.
- Document Size
- Select the exact size of your document from a selection of preset scan sizes. If you select Custom, the Custom Document Size dialog box appears and you can specify the document size.
-
 (ADS-1300) Auto is not available for scanning at resolutions greater than 400 x 400 dpi.
- 2-sided Scanning
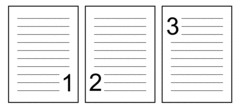
- Scan both sides of the document. Select Long-edge binding or Short-edge binding depending on the layout of your original to make sure the data file created appears correctly in the scanned document.
 2-sided Scanning is not available for Long Paper.
2-sided Scan Setting Original Layout Scan Result Long-edge binding 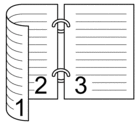
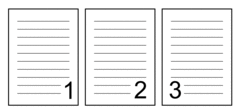
Short-edge binding 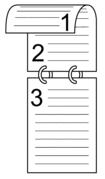
- Advanced Settings
- Configure advanced settings by clicking the Advanced Settings link in the Scanner Setup dialog box.
- Document Correction
- Cropping
- Auto Deskew
Set the machine to correct document skewing automatically.

- Auto Deskew feature is automatically set to On if you select Auto for the Document Size.
- (ADS-1300) Auto Deskew is not available for scanning at resolutions greater than 400 x 400 dpi.
- Detect End of Page (ADF)
Detects the end of page and automatically adjusts the size of a page when the length of the document is shorter than the Document Size selected.
- Margin Settings
This feature allows you to add or remove a specific margin (from -2 mm to 4 mm) at the edge of the image. A positive value increases the size of the scanned image when it is output and a negative value decreases the size of the scanned image when it is output.
 Margin Settings is available only when Document Size is set to Auto.
- Rotate Image
Changes the direction of the document based on the text orientation.
- Fill With Color
- Edge Fill
Fill in the edges on four sides of the scanned image using the selected colour and range.
- Punch Hole Removal
This feature removes the punch hole markings by filling hole marks with white or the surrounding colour.
- Auto Colour Detect Adjust
When colour setting Auto is selected, you can adjust the detection level of colour. Increasing the slider value makes the machine more likely to determine that a given document is a colour document.
- Skip Blank Page
Remove the document's blank pages from the scanning results.
- Enhancement
- Diffusion Adjustment -Grey
This function adjusts the brightness and contrast to create grey images.
 Only effective when the Color Setting is Grey (Error Diffusion).
- Brightness
- Set the Brightness level by moving the slider to the right or left to lighten or darken the image. If the scanned image is too light, set a lower brightness level and scan the document again. If the image is too dark, set a higher brightness level and scan the document again. You can also type a value in the field to set the brightness.
- Contrast
- Increase or decrease the Contrast level by moving the slider to the right or left. An increase emphasises dark and light areas of the image, while a decrease reveals more details in grey areas. You can also type a value in the field to set the contrast.
- Colour Tone Adjustment
Allows you to adjust the brightness, contrast, shadow, highlight, and gamma during True grey and colour scanning.
- Background Processing
- Remove Bleed-through / Pattern
Prevent bleed-through.
- Remove Background Colour
Remove the base colour of documents to make the scanned data more legible.
- Colour Drop
Select a colour to remove from the scanned image.
- Edge Emphasis
Make the characters of the original sharper.
- Moire Reduction
Reduce the moiré pattern, or cross-hatching, in a scanned image.
 The following items can be selected when scanning colour or grey images:
- Colour Tone Adjustment
- Edge Emphasis
- B&W Image Quality
- B&W Threshold Adjustment
This setting allows you to adjust the image quality when scanning in Black & White mode. Larger values increase the amount of black in the scanned image, while smaller values increase the amount of white.
- Character Correction
Correct any broken or incomplete characters in the original to make them easier to read.
 Character Correction can be selected when scanning monochrome images.
 - B&W Inversion
This feature allows you to create a monochrome inverted version of the scanned image.
- Noise Reduction
You can improve and enhance the quality of your scanned images with this selection. The Noise Reduction setting is available when a document size other than Long Paper is selected in Black & White mode.
- Remove Ruled Line
This feature allows you to remove lines in the document. You can select the type of line direction to remove (Vertical, Horizontal, Vertical and Horizontal).
- Minimum Line Length
Lines longer than or equal to the specified length are removed.
- Maximum Clearance
If lines are broken, for example due to fading of the image, the lines that are broken for an interval less than or equal to the specified broken line distance will be detected and removed.
Original DocumentScan ResultDescriptionThere are horizontal and vertical lines.

 If you select Vertical, the vertical line is removed.
 If you select Horizontal, the horizontal line is removed.
 If you select Vertical and Horizontal, all lines are removed.
- Feed Control
- Layout
Allows you to scan a two-page document combined into one page, or scan a one-page document divided into two pages.
Choose one of the following options:
Option Description 2in1: Long Edge Combine a two-page document into a single page using landscape orientation. 
2in1: Short Edge Combine a two-page document into a single page using portrait orientation. 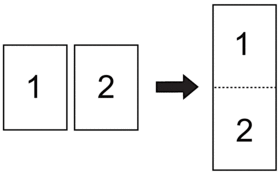
1 to 2: Long Edge Divide a one-page document into two pages using portrait orientation. 
1 to 2: Short Edge Divide a one-page document into two pages using landscape orientation. 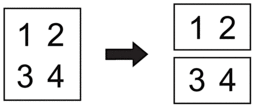
- Carrier Sheet Mode
Use the optional Carrier Sheet to scan the following document types:
- Important documents (photos, contracts)
- Thin paper (receipts)
- Irregularly-shaped paper (clippings)
- Single Page Scan
Scans one page at a time from the ADF, regardless of the number of pages in the ADF.
- Continuous Scan
Select this option to scan additional documents using the same settings when a scan has been completed. It is useful when you are scanning more documents than the ADF can hold or when you are scanning several documents at once.
 (ADS-1300/ADS-1350W) Auto is available only when using the USB connection.
- Additional Functions
- Barcode Detection
The machine reads the barcode printed on the scanned image. Specify the barcode type and detection area.

- Barcode Detection is available when Layout is Off.
- To scan and read barcodes, use a third-party application. The TWAIN driver alone cannot convert barcodes into data.
- JPEG Compression
Changes the quality of the JPEG file to be saved.
 This function is available only when using a third-party application with Disk File mode.
 - Digital Imprinter
Add the date, time, document count, or other custom text on your scanned image.


