Home > Introduction to Your Brother Machine > Touchscreen LCD Overview
Touchscreen LCD Overview
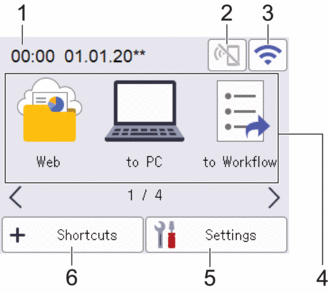
Home Screens
You can switch Home screens by pressing  or
or  .
.
From the Home screens, you can access various settings.

- Date & Time
Displays the date and time set on the machine.
This area is also used to display error or maintenance messages.
 (Wi-Fi Direct Status)
 Press to configure Wi-Fi Direct settings.
The following icons show the Wi-Fi Direct status:

- Your machine is not connected to the Wi-Fi Direct network.
Press this icon to configure Wi-Fi Direct settings.
- Wi-Fi Direct is disabled.

Your machine is connected to the Wi-Fi Direct network.

The Wi-Fi Direct network cannot be detected.
 (Wireless Status)
 The following icons show the wireless network status:

- Your machine is not connected to the wireless access point/router.
Press this icon to configure wireless settings. For more detailed information, see the Quick Setup Guide.
- The wireless setting is disabled.

The wireless network is connected.
A three-level indicator in each of the Home screens displays the current wireless signal strength.

The wireless access point/router cannot be detected.

You can configure wireless settings by pressing the Wireless Status button.
Modes:
Press to switch to each mode.- [Web]
Press to connect your machine to an Internet service.
- [to PC]
Press to access the Scan to PC function.
- [to Workflow]
Press to access the Scan to Workflow function.
 Settings must be configured in iPrint&Scan in advance.
 - [to Network]
Press to access the Scan to Network function.
- [to FTP/SFTP]
Press to access the Scan to FTP/SFTP function.
- [to Email Server]
Press to access the Scan to Email Server function.
- [to SharePoint]
Press to access the Scan to SharePoint function.
- [Apps]
Press to connect your machine to the Brother Apps service.
- [WS Scan]
Press to access the WS Scan function.
- [to USB]
Press to access the Scan to USB function.
 ([Settings])
 Press to access the Settings menu.
 ([Shortcuts])
 Press to create Shortcuts for frequently-used operations such as Scan to PC, Scan to Email Server, Scan to USB, or other functions.
You can quickly scan using the options set as Shortcuts.
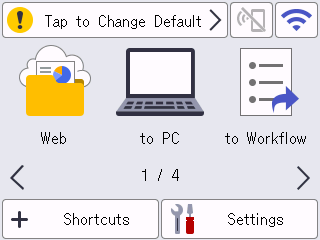
- If an error message or notification appears in the information bar, press the message area to view the details.

- The warning icon
 appears when there is an error or maintenance message.
 - The information icon
 appears when there are helpful hints or supplementary information available.
- This product adopts the font of ARPHIC TECHNOLOGY CO., LTD.
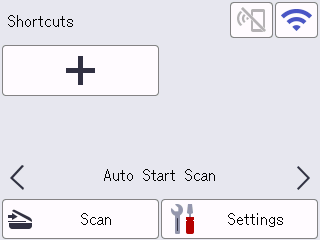
Auto Start Scan
The Auto Start Scan feature allows you to start scanning automatically as soon as a document is placed in the ADF.
To use Auto Start Scan, you must first create an Auto Start Scan Shortcut, and then enable the Auto Start Scan setting in [General Setup]:
- Press [Shortcuts].
- Press
 to display [Auto Start Scan].
- Press
 to add the Auto Start Scan Shortcut.
 - Select the Shortcut function (for example, Scan to PC).
- Press [Save as Shortcut]. When the LCD displays [These settings will be saved as a shortcut.], press [OK].
- Enter the Shortcut Name and press [OK]. When the LCD displays [Make this a One Touch Shortcut?], press [OK].
- Press
 ([Settings]) to access the Settings menu. Press and select [On].
- NOTE
- Only one Auto Start Scan profile can be saved at a time.
Settings Menu
Press  ([Settings]) to check and access all the machine’s settings.
- [General Setup]
Press to access the General Settings menu.
- [Shortcut Settings]
Press to set Shortcuts. This option is unavailable and cannot be selected if you have not added Shortcuts.
- [Network]
Press to access Network settings.
- [Machine Info.]
Press to check the machine’s information.
- [Initial Setup]
Press to access the [Date and Time], [Reset], and [Local Language] menus.


