Home > Introduction to Your Machine > Control Panel Overview
Control Panel Overview
Colours of the control panels and buttons shown in these illustrations may differ depending on the model.
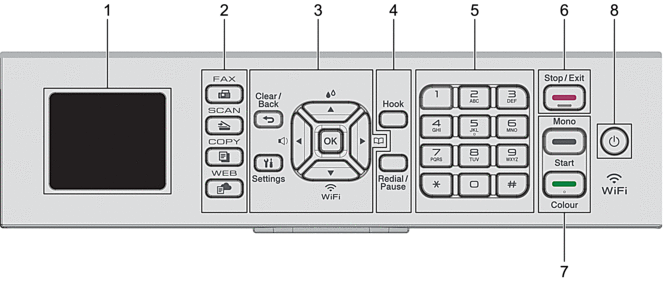
MFC-J1010DW

- 1.8"(44.9 mm) Liquid Crystal Display (LCD)
- Displays messages to help you set up and use the machine.
- Mode Buttons
-
 FAX
FAX - Press to switch the machine to Fax mode.
 SCAN
SCAN - Press to switch the machine to Scan mode.
 COPY
COPY - Press to switch the machine to Copy mode.
 WEB
WEB - Press to switch the machine to Web mode.
- Settings Buttons
-
-
 Clear/Back
 - Press to go back to the previous menu.
 Settings
 - Press to access the main menu.
- OK
- Press to select a setting.
-


- Press to access the ring volume adjustment menu while the machine is idle.
-

- Press to access the ink menu while the machine is idle.
-

-
- Press to store Speed Dial and Group numbers in the machine's memory.
- Press to look up and dial numbers that are stored in the machine's memory.
-

- Press to configure the wireless settings while the machine is idle.
-
 or
or 
- Press to scroll through the menus and options.
-
 or
or 
-
- Press to move the cursor left or right on the LCD.
- Press to either confirm or cancel a procedure which is in progress.
-
- Telephone Buttons
-
- Hook
- If the machine is in Fax/Tel (F/T) mode and you pick up the handset of an external telephone during the F/T ring (pseudo/double-ring), press Hook to talk.
- Redial/Pause
-
- Press to redial the last number you called.
- Press to select and redial the numbers from the Outgoing Call History or Caller ID History.
- Press to insert a pause when dialling numbers.
- Dial Pad
-
- Use to dial fax and telephone numbers.
- Use as a keyboard to enter text or characters.
 Stop/Exit
 -
- Press to stop an operation.
- Press to exit from a menu.
- Start Buttons
-
 Mono Start
 -
- Press to start sending faxes in monochrome.
- Press to start making copies in monochrome.
- Press to start scanning documents (in colour or monochrome, depending on the scan setting).
 Colour Start
 -
- Press to start sending faxes in full colour.
- Press to start making copies in full colour.
- Press to start scanning documents (in colour or monochrome, depending on the scan setting).
 Power On/Off
 - Press
 to turn the machine on.
 - Press and hold
 to turn the machine off. The LCD displays [Shutting Down] and stays on for a few seconds before turning itself off. A connected external telephone or Telephone Answering Device (TAD) will always remain available.
 - If you turn the machine off using
 , it will still clean the print head periodically to maintain print quality. To prolong print head life, provide better ink efficiency, and maintain print quality, keep your machine connected to a power source at all times.
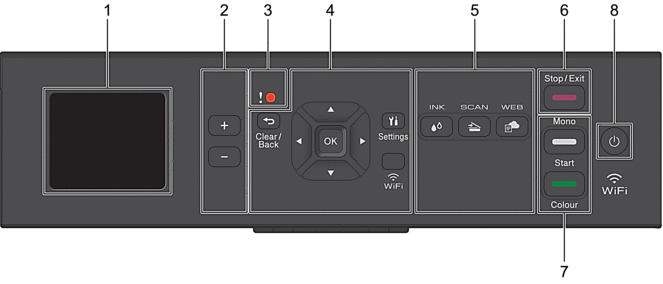
DCP-J1050DW

- 1.8"(44.9 mm) Liquid Crystal Display (LCD)
- Displays messages to help you set up and use the machine.
- Number of Copies
- Press + to increase or - to decrease the number of copies.
- Warning icon
- The warning icon lights up when there is an error or maintenance message.
- Settings Buttons
-
-
 Clear/Back
 - Press to go back to the previous menu.
 Settings
 - Press to access the main menu.
- OK
- Press to select a setting.
- WiFi
- Press to configure the wireless settings while the machine is idle.
-
 or
or 
- Press to scroll through the menus and options.
-
 or
or 
-
- Press to move the cursor left or right on the LCD.
- Press to either confirm or cancel a procedure which is in progress.
-
- Mode Buttons
-
-
 INK
INK - Press to access the ink menu while the machine is idle.
 SCAN
SCAN - Press to switch the machine to Scan mode.
 WEB
WEB - Press to switch the machine to Web mode.
-
 Stop/Exit
 -
- Press to stop an operation.
- Press to exit from a menu.
- Start Buttons
-
 Mono Start
 -
- Press to start making copies in monochrome.
- Press to start scanning documents (in colour or monochrome, depending on the scan setting).
 Colour Start
 -
- Press to start making copies in full colour.
- Press to start scanning documents (in colour or monochrome, depending on the scan setting).
 Power On/Off
 - Press
 to turn the machine on.
 - Press and hold
 to turn the machine off. The LCD displays [Shutting Down] and stays on for a few seconds before turning itself off.
 - If you turn the machine off using
 , it will still clean the print head periodically to maintain print quality. To prolong print head life, provide better ink efficiency, and maintain print quality, keep your machine connected to a power source at all times.
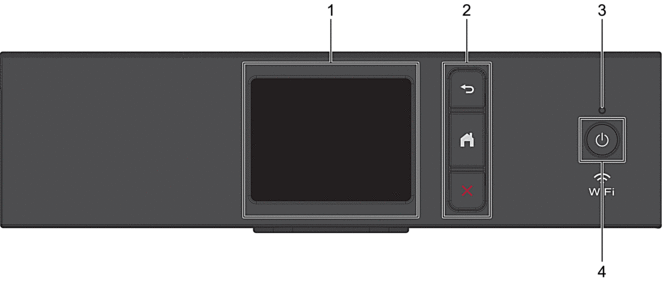
DCP-J1140DW

- Touchscreen Liquid Crystal Display (LCD)
- Access menus and options by pressing them on the touchscreen.
- Menu Buttons
-
 (Back)
 - Press to go back to the previous menu.
 (Home)
 - Press to return to the Home screen.
 (Cancel)
 - Press to cancel an operation.
- LED Power Indicator
- The LED lights up depending on the machine’s power status.
When the machine is in Sleep Mode, the LED blinks.
 Power On/Off
 - Press
 to turn the machine on.
 - Press and hold
 to turn the machine off. The touchscreen displays [Shutting Down] and stays on for a few seconds before turning itself off.
 - If you turn the machine off using
 , it will still clean the print head periodically to maintain print quality. To prolong print head life, provide better ink efficiency, and maintain print quality, keep your machine connected to a power source at all times.
Did you find the information you needed?


