Home > Introduction to Your Machine > Control Panel Overview
Control Panel Overview
The control panel may vary depending on your model.
HL-L5210DN/HL-L5210DW/HL-L5215DN/HL-L6210DW
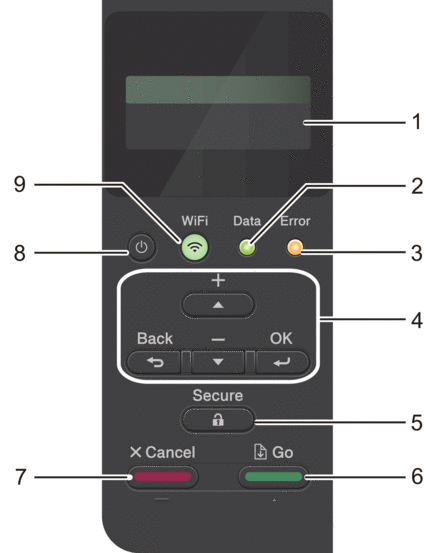
- Liquid Crystal Display (LCD)
- Displays messages to help you set up and use the machine.
-
Wireless Network Models
A four-level indicator shows the wireless signal strength if you are using a wireless connection.

- Data LED
-
The Data LED blinks depending on the machine’s status.
When the Data LED is on, data is in the machine’s memory. When the Data LED blinks, the machine is receiving or processing data.
- Error LED
-
The Error LED blinks when the LCD displays an error or an important status message.
- Menu Buttons
-
- OK
-
Press to store your machine’s settings. After you change a setting, the machine returns to the previous menu level.
- Back
-
- Press to go back one level in the menu.
- Press to select the previous digit when entering numbers.
- Press to select the previous digit when entering letters or numbers.
 or
or  (+ or -)
 -
- Press to scroll through menus and options.
- Press to enter a number or to increase or decrease the number. Hold down
 or
or  to scroll faster. When you see the number you want, press OK.
 Secure
 - Press to print any jobs saved in the machine's memory. You may need to enter your four-digit password.
 Go
Go -
- Press to clear certain error messages. To clear any other error messages, follow the LCD instructions.
- Press to print any data remaining in the machine's memory.
- Press to select the displayed option. After you select an option, the machine returns to Ready Mode.
 Cancel
 -
- Press to cancel the current setting.
- Press to cancel a programmed print job and clear it from the machine’s memory. To cancel multiple print jobs, press and hold Cancel until the LCD displays [Cancel All Jobs].
 Power On/Off
 -
- Turn the machine on by pressing
 .
. - Turn the machine off by pressing and holding down
 .
.
 WiFi button or
  Network button (depending on your model)
 -
Wired Network Models:
Network
Press the Network button to configure wired network settings.
Wireless Network Models:
WiFi
Launch the wireless installer on your computer and press the WiFi button. Follow the on-screen instructions to configure a wireless connection between your machine and your network.
When the WiFi light is on, your machine is connected to a wireless access point. When the WiFi light blinks, it means that the wireless connection was interrupted, or your machine is in the process of connecting to a wireless access point.
HL-L6410DN/HL-L6415DN
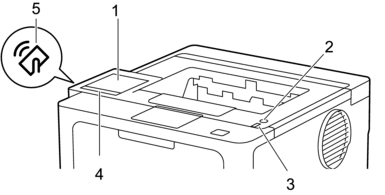
- Touchscreen Liquid Crystal Display (LCD)
- Access menus and options by pressing them on the touchscreen.
From the Home screen, you can access the WiFi setup *1, Toner Level, Settings, Functions, and Secure Print screens.
The Home screen displays the machine's status when the machine is idle.
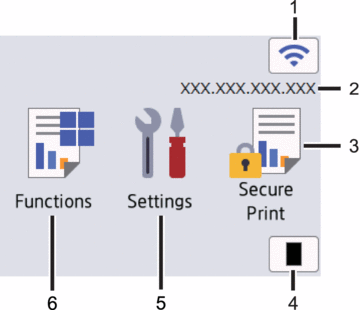
 (Wireless Status) *1
 Press to configure the wireless settings.
For certain models, the Home screen displays the wireless status when the optional Wireless Module is installed.
If you are using a wireless connection, a four-level indicator on the Home screen displays the current wireless signal strength.

If you see
 displayed as the wireless status, press it to select a wireless connection method or configure an existing wireless connection.
- IP Address
If the IP Address setting in the Screen Settings menu is turned on, your machine's IP address appears on the Home screen.
 [Secure Print]
 Press to access the Secure Print option.
 [Toner]
 Displays the remaining toner life. Press to access the [Toner] menu.
 [Settings]
 Press to access the [Settings] menu.
Use the Settings menu to access all of your machine's settings.
If the Setting Lock is set to On, a lock icon
 appears on the LCD. You must unlock the machine to change any settings.
  [Functions]
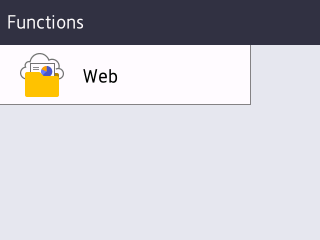
 Press to access the Functions screen.
 [Web]
[Web] Press to connect your machine to an Internet service.
 (Warning) icon
 -
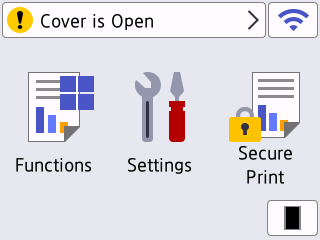
The warning icon
 appears when there is an error or maintenance message. Press
  to view it, address the issue, and then press
  to return to Ready Mode.
 Power On/Off
 -
- Turn the machine on by pressing
 .
. - Turn the machine off by pressing and holding down
 .
.
- LED Power Indicator
- The LED lights up depending on the machine’s power status.
- Touchpanel
-
 (Back)
 - Press to go back to the previous menu.
 (Home)
 - Press to return to the Home screen.
 (Cancel)
 - Press to cancel an operation or to cancel a programmed print job and clear it from the machine’s memory.
- Near Field Communication (NFC)
- Use card authentication, if applicable, by touching your Integrated Circuit Card (IC Card) to the NFC symbol on the machine.


