Home > Routine Maintenance > Check Your Brother Machine > Check the Print Alignment from Your Brother Machine
Check the Print Alignment from Your Brother Machine
DCP-T520W/DCP-T525W/DCP-T720DW/DCP-T725DW/DCP-T820DW/DCP-T825DW
- Press Menú (Menu).
- Press
 or
or  to make your selections:
 - Select [Maintenance]. Press OK.
- Select [ImproveQuality]. Press OK.
- Select [Alignment]. Press OK.
- Press Inicio Negro (Black Start) or Inicio Color (Color Start).The machine prints the Alignment Check Sheet.

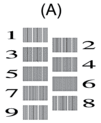
- For pattern (A), press
 or
or  to select the number of the test print that has the fewest visible vertical stripes (1-9), and then press OK.
 In the example above, row number 6 is the best choice.
Repeat this step for the rest of the patterns.

When the print alignment is not adjusted correctly, text looks blurry or crooked, like this:

After the print alignment is adjusted correctly, text looks like this:

- Press Detener/Salir (Stop/Exit).
MFC-T920DW/MFC-T925DW
- Press
 (Ink).
 - Press
 or
or  to make your selections:
 - Select [Impr. PrintQuality]. Press OK.
- Select [Alignment]. Press OK.
- Follow the LCD instructions.The machine prints the Alignment Check Sheet.

- For pattern (A), press
 or
or  to select the number of the test print that has the fewest visible vertical stripes (1-9), and then press OK.
 In the example above, row number 6 is the best choice.
Repeat this step for the rest of the patterns.

When the print alignment is not adjusted correctly, text looks blurry or crooked, like this:

After the print alignment is adjusted correctly, text looks like this:

- Press Detener/Salir (Stop/Exit).


