Home > Scan > Scan from Your Computer (Windows) > Scan Using Nuance™ PaperPort™ 14SE or Other Windows Applications > TWAIN Driver Settings (Windows)
TWAIN Driver Settings (Windows)

- Note that the item names and assignable values will vary depending on the machine.
- The Contrast option is available only when selecting the Gray (Error Diffusion), True Gray, or 24bit Color options from the Scan Type settings.
- Scan
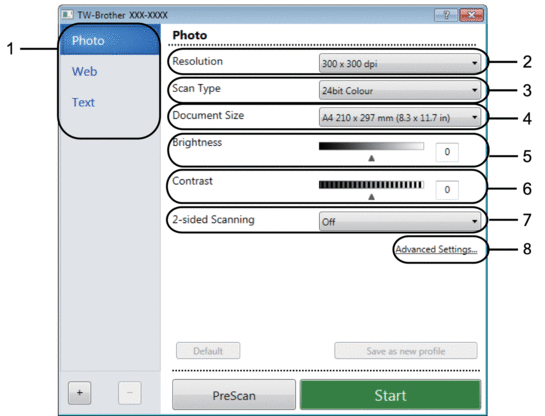
- Select the Photo, Web, or Text option depending on the type of document you want to scan.
Scan (Image Type) Resolution Scan Type Photo Use for scanning photo images. 300 x 300 dpi 24bit Color Web Use for attaching the scanned image to web pages. 100 x 100 dpi 24bit Color Text Use for scanning text documents. 200 x 200 dpi Black & White
- Resolution
- Select a scanning resolution from the Resolution drop-down list. Higher resolutions take more memory and transfer time, but produce a finer scanned image.
- Scan Type
- Select from a range of scan colour depths.
-
- Black & White
- Use for text or line art images.
- Gray (Error Diffusion)
- Use for photographic images or graphics. (Error Diffusion is a method for creating simulated grey images without using true grey dots. Black dots are put in a specific pattern to give a grey appearance.)
- True Gray
- Use for photographic images or graphics. This mode is more accurate because it uses up to 256 shades of grey.
- 24bit Color
- Use to create an image with the most accurate colour reproduction. This mode uses up to 16.8 million colours to scan the image, but it requires the most memory and has the longest transfer time.
- Document Size
- Select the exact size of your document from a selection of preset scan sizes.
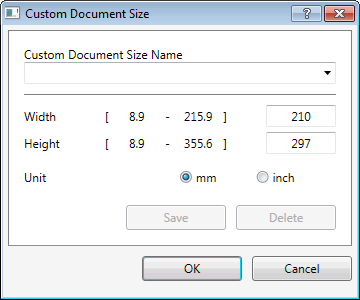
If you select Custom, the Custom Document Size dialog box appears and you can specify the document size.

- Brightness
- Set the Brightness level by dragging the slider to the right or left to lighten or darken the image. If the scanned image is too light, set a lower brightness level and scan the document again. If the image is too dark, set a higher brightness level and scan the document again. You can also type a value in the field to set the brightness level.
- Contrast
- Increase or decrease the Contrast level by moving the slider to the right or left. An increase emphasises dark and light areas of the image, while a decrease reveals more details in grey areas. You can also type a value in the field to set the contrast level.
- 2-sided Scanning
- Scan both sides of the document. When using the Automatic 2-sided Scan feature, you must select the Long-edge binding or Short-edge binding option from the 2-sided Scanning drop-down list, so when you turn the pages, they are facing the way you want.
(MFC-L2750DW/MFC-L2751DW/MFC-L2770DW/MFC-L2771DW)
- Advanced Settings
- Configure advanced settings by clicking the Advanced Settings button in the Scan Settings dialog box.
- Paper Detection
- Auto Deskew
Set the machine to correct document skewing automatically as the pages are scanned from the ADF.
- Rotate Image
Rotate the scanned image.
- Image Quality
- Background Processing
- Remove Bleed-through / Pattern
Prevent bleed-through.
- Remove Background Color
Remove the base colour of documents to make the scanned data more legible.
- Color Drop
Select a colour to remove from the scanned image.
- Boldface Formatting
Emphasise the characters of the original by making them bold.
- Blurred Character Correction
Correct the broken or incomplete characters of the original to make them easier to read.
- Edge Emphasis
Make the characters of the original sharper.
- Reduce Noise
Improve and enhance the quality of your scanned images with this selection. The Reduce Noise option is available when selecting the 24bit Color option and the 300 x 300 dpi, 400 x 400 dpi, or 600 x 600 dpi scan resolution.
- Page Control
- Edge Fill
Fill in the edges on four sides of the scanned image using the selected colour and range.
- Continuous Scan
Select this option to scan multiple pages. After a page is scanned, select either continue scanning or finish.


