Home > Print > Print from Your Computer (Windows) > Print Settings (Windows)
Print Settings (Windows)
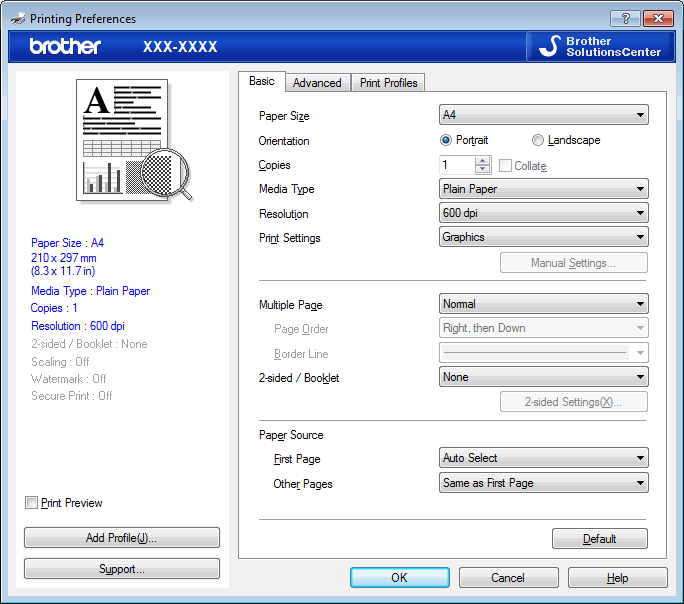
Basic Tab

- Paper Size
- Select the size of the paper you want to use. You can either choose from standard paper sizes or create a custom paper size.
- Orientation
- Select the orientation (portrait or landscape) of your printout.
If your application contains a similar setting, we recommend that you set the orientation using the application.
- Copies
- Type the number of copies (1-999) that you want to print in this field.
-
- Collate
- Select this option to print sets of multi-page documents in the original page order. When this option is selected, one complete copy of your document will print, and then reprint according to the number of copies you choose. If this option is not selected, then each page will print according to the number of copies chosen before the next page of the document is printed.
- Media Type
- Select the type of media you want to use. To achieve the best print results, the machine automatically adjusts its print settings according to the selected media type.
- Resolution
- Select the print resolution. As print resolution and speed are related, the higher the resolution, the longer it will take to print the document.
- Print Settings
- Select the type of document you want to print.
-
- Manual Settings...
- Specify advanced settings such as brightness, contrast, and other settings.
-
- Graphics
-
- Use Printer Halftone
- Select this option to use the printer driver to express halftones.
-
- Brightness
- Specify the brightness.
- Contrast
- Specify the contrast.
- Graphics Quality
- Select either Graphics or Text for the best print quality, based on the type of document you are printing.
- Improve Gray Printing
-
Select this option to improve the image quality of shaded areas.
- Improve Pattern Printing
- Select this option to improve the pattern printing if printed fills and patterns are different from the fills and patterns you see on your computer screen.
- Improve Thin Line
- Select this option to improve the image quality of thin lines.
-
- Use System Halftone
- Select this option to use Windows to express halftones.
-
- TrueType Mode (Available only for certain models)
-
- Mode
- Select how the fonts are processed for printing.
- Use Printer TrueType Fonts
- Select whether to use built-in fonts for the font processing.
- Multiple Page
- Select this option to print multiple pages on a single sheet of paper, or print one page of your document on multiple sheets.
-
- Page Order
- Select the page order when printing multiple pages on a single sheet of paper.
- Border Line
- Select the type of border to use when printing multiple pages on a single sheet of paper.
- 2-sided / Booklet
- Select this option to print on both sides of the paper, or print a document in booklet format using 2-sided printing.
-
- 2-sided Settings button
- Click this button to select the type of 2-sided binding. Four types of 2-sided bindings are available for each orientation.
- Paper Source
- Select the paper source setting according to your print conditions or purpose.
-
- First Page
- Select the paper source to use for printing the first page.
- Other Pages
- Select the paper source to use for printing the second and subsequent pages.
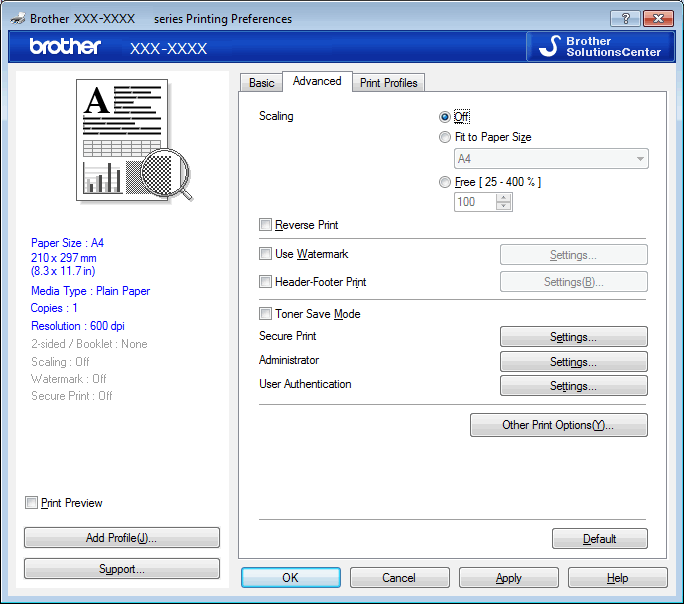
Advanced Tab

- Scaling
- Select these options to enlarge or reduce the size of the pages in your document.
-
- Fit to Paper Size
- Select this option to enlarge or reduce the document pages to fit a specified paper size. When you select this option, select the paper size you want from the drop-down list.
- Free [25 - 400%]
- Select this option to enlarge or reduce the document pages manually. When you select this option, type a value into the field.
- Reverse Print
- Select this option to rotate the printed image 180 degrees.
- Use Watermark
- Select this option to print a logo or text on your document as a watermark. Select one of the preset watermarks, add a new watermark, or use an image file you have created.
- Header-Footer Print
- Select this option to print the date, time and PC login user name on the document.
- Toner Save Mode
- Select this feature to conserve toner by using less toner to print documents; printouts appear lighter, but are still legible.
- Secure Print (Available only for certain models)
- This feature ensures that confidential or sensitive documents do not print until you enter a password on the machine's control panel.
- Administrator
- This feature allows you to change the administrator password and restrict various printing functions.
- User Authentication (Available only for certain models)
- This feature allows you to confirm the restrictions for each user.
- Other Print Options button
-
- Sleep Time
- Select this option to set the machine to enter sleep mode immediately after printing.
- Macro (Available only for certain models)
- Select this feature to print an electronic form (macro), which you have stored in your machine's memory, as an overlay on the print job.
- Density Adjustment
- Specify the print density.
- Improve Print Output
- Select this option to reduce the amount of paper curling and improve the toner fixing.
- Skip Blank Page
- Select this option to allow the printer driver to automatically detect blank pages and exclude them from printing.
- Print Text in Black
- Select this option when you want to print colour text in black.
- Print Archive
- Select this option to save the print data as a PDF file to your computer.
- Eco settings
- Select this option to reduce printing noise.
Was this page helpful?


